
A beginner introduction to arrays, loops, and conditionals. Why we need them and how they all fit together in a front-end context. It’s a bird’s eye view of organising data, accessing it, and doing things to it. Covering fundamental every-day concepts for a front-end developer.
Introduction
“So we take this array, we iterate over it, we process the data and shazam!” When I first started learning to program, phrases like this sounded like mystical incantations. A language that looks like English but was beyond my comprehension. Coming from a non-engineering background I couldn’t for the life of me understand where a loop fit into what I was trying to do. And why exactly I needed it.
Nowadays, as a front-end developer, I use loops and arrays for something or another all the time. But I haven’t forgotten how mysterious it all was. My aim here is to give a high-level overview designed for people who have no engineering background. We will go beyond the syntax and instead focus on a real context of why we use these and how it all fits together.
In this article we will talk about data structures (arrays), how we organise data (and what even is data). How we access this data and then how we do things to it (loops and conditionals). More importantly, we are gonna try to answer why we need to do this. And how is this relevant to you building websites and web apps.
There’s also going to be a beginner-friendly practical example. You can follow along to practice the concepts and see them in action for yourself.

The setup
Let’s imagine that we are working on an online platform that allows us to do our supermarket shopping from a website. That’s a real-world application of the things we want to talk about here.
Take a look at Lola Market, which is where I work, for an example of how this would look like.
Assume we have a bunch of products stored in our database. Our task is to take these, display them on the website as a list, and finally add a (v) next to vegetarian items.
It’s a simple task that mimics things we do every day in the front end. It will allow us to see those three big concepts we need to understand.
Organising data
Before we start talking about how we organise data, let's try to understand what data means in our context. And where this data comes from, to begin with.
What even is data?
When you are working in the digital domain it’s helpful to remember that everything is data. Everything is bits stored in binary.
Now while that might be interesting, it is so general that it is of no help to us. So for our purposes, we will focus on a narrow idea of what data is. The one which is most immediately relevant. Take a look at the following list:
 List of products
This reduced list is an example of the kind of products you can find on this website we are building. This list is our data: mushrooms, steak, fish, aubergines, and lentils.
So where does this data come from?
Data can live directly in your app, in your front-end code. But more commonly it comes from some outside source. Usually, this data is stored in a database.
The front end makes a request to the database and receives this data as a response. Once it has arrived into our front-end app, it is time for us to do what we need with it. For example, show the product name on the website, style it, and add any functionalities needed (such as an “add to cart” button).
Take a look at any of the popular shopping websites and you’ll see the same pattern. It will have a list of products presented in a certain style with various functionalities and other information about it.
How do we organise data?
So we have established that this list of products is our data. Now we have to package this data in some sort of a container. This will enable us to organise it, move it around, and later access it and do stuff to it.
One of the most common ways to organise data that you will work with frequently is called an array. Here’s what an array looks like:
['mushrooms', 'steak', 'fish', 'aubergines', 'lentils']The syntax looks simple enough. You create an array with the square brackets []. And separate the individual elements with a comma ,. If your data is made up of strings put each element inside quotes or double quotes ''. String loosely means a bunch of characters representing text, like words and sentences.
And that’s it. You have just organised your data in a single package called an array. And we can do lots of things with this now. You can think of an array as merely a container that allows us to put data inside, organise it in a certain structure, and permits us to do things with it.
An array is one example of what we call data structures. These are the various ways we use to organise data. There are a lot of them, but the two most common ones in the front end are arrays and objects.
So, to recap. For our online supermarket, we have a bunch of products and that’s our data. We saw how we organise this data into data structures like the array. This is usually stored in a database. We can then request this data. And once it “arrives” to our front-end app from the database we can start processing it and doing things with it.
Now we can write the logic that takes each product and displays its name on our website. But how do we select each item from the array and do things to it?

Loops
That’s where the loops come in. Simply put, a loop is a way to take our array, “open” it and take one element out. Hand it to us to do what we want to it. Then repeat with the next element all the way to the end of the array.
We use a loop when we need to repeat the same code for each one of the elements in our data.
Get set
What we want to do is to display the list of products on the website.
To keep the example simple and accessible to beginners we are going to use dev tools to do all the work. This requires no setup apart from opening your browser’s dev tools.
We need to take a few things into account.
We will not be making a call to the database to get our list of products. Instead, we will type an array by hand and use it directly in our front-end code.
We will not be displaying the list of products on a website. Instead, we are only going to log the list into the dev tools console.
In the real world, we wouldn’t be using the
console.log()statements you see here. Instead, the logic we need to display our list on the website would be in its place.
OK, we are all set. Let’s go.
For each product
First, let’s take our loop and store it in a variable. This is to make it easier to read and work with.
const products = ['mushrooms', 'steak', 'fish', 'aubergines', 'lentils']Now every time we use products we are actually referring to our array. This is very handy because our array could easily contain hundreds of products.
So, on we go to the main course, let me introduce you to the forEach()
loop. And here is what it looks like in action:
products.forEach( product => {
    // do stuff
})
We will break this down piece by piece now. To begin with, let’s convert this snippet of code into plain English. This literally reads: “Take the products array. For each element in this array, take that element, call it product and do stuff to it.”
Let’s take a closer look.
⬇ARRAY⬇ ⬇LOOP⬇ ⬇CURRENT⬇ ⬇FUNCTION⬇
products.forEach( product => {
// do stuff
})products: This is our array that contains the data..forEach(): This is our array method, the loop.product: This is the currently selected element. This is the item from the array that our loop has picked up and given to us to work with.=> { }: This is a function declaration, an arrow function to be specific. It roughly says “execute the following code.”// do stuff: This is where the actual code goes. Do things for each of the elements in the array.
It is important to remember two things here about the currently selected element. First, that product is a variable name. The name itself is ours to decide, we could have called it food or x or anything else. However, if we are dealing with an array of products it is customary to use the singular for an individual item of that array: product. If it was an array of animals then we would call it animal.
Second, product changes with every round the loop does. Each time the loop picks an item product becomes this new currently selected item.
Basically, the loop starts by picking up the first element in the array, “mushrooms” in this case. product now refers to “mushroom”. The loop then executes the function and runs the code that is there. Once it’s finished it goes back to the array and picks up the next element. product is no longer “mushrooms”, it is “steak” now. Once again the code executes. And this repeats for each one of the elements in the array.
Each one of those rounds the loop makes is called an iteration.
Try it yourself
So let’s try this out and see how it works. Go ahead and open the console in your browser’s dev tools. For example in Chrome it is Command + Option + J (Mac) or Control + Shift + J (Windows).
Type out our array saved in a variable
const products = ['mushrooms', 'steak', 'fish', 'aubergines', 'lentils'].Hit enter. You’ll get an
undefined. This is normal.Then type out our loop and this time we will add a
console.log()as the code to execute:products.forEach(product => { console.log(product) })
This is what it would look like:
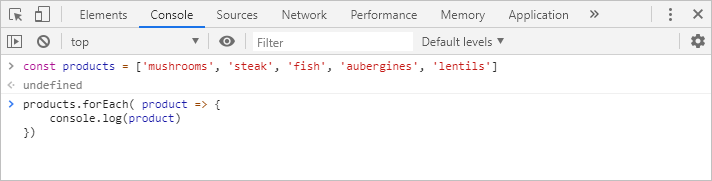 The Chrome dev tools console
What we want here is to print to the console the value that is product on each iteration. Try it for yourself. Hit enter.
Once you do, the loop will start. For each product, it will log the currently selected one to the console until it’s done with all the products in our array.
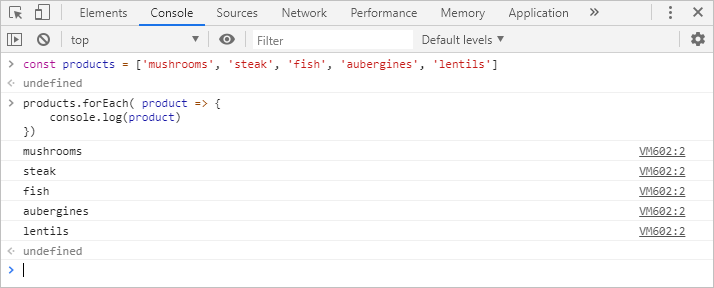 The loop´s results in the console
And That’s it. We have printed our entire array to the console. And we can use the same idea to manipulate the DOM to display and modify content on a website. Or do a myriad of other things with the data.
To recap, a loop takes our data (an array in this case) and allows us to access it. It then iterates over each element in the array and executes some code for each element.
What about if we wanted to treat some of this data differently and not execute the same code for all the products? Say for example we want to show a “(v)” only next to vegetarian items.
Conditionals
Conditionals are our third pilar and another essential building block of programming. They are a way to do something only if certain conditions are met. The simplest and most common conditional in JavaScript is the if statement. Take a look at an example:
if (product === 'steak') {
    // do stuff
}
Let’s start by translating this to English: “If the variable called product is exactly the string of characters 'steak' then execute the code within.”
Here’s a closer look
if: This is the conditional.(product === ‘steak’): This is our condition. There are a lot of ways you can construct conditions. We don’t need to worry about this yet. For now, bear in mind that whatever we put here will always be evaluated to either true or false.// do stuff: The statement. This is where the code we want to run goes. It will be executed only if the result of the evaluation of the condition istrue. Otherwise, it will be ignored.
This bit of code will work on its own just fine, but we can have much more detailed control by using its friends else if and else. else if adds another condition to check and executes another separate block of code, while else becomes the default action to take if none of the conditions are met.
Vegetarian-friendly
Let’s focus back on our original objective, which is to log a “(v)” next to the name of vegetarian items. This is a prime example of when we need to use a conditional. We want code that, if the product in the array is vegetarian, to print its name and add to it the “(v)”. And if it’s not vegetarian, to only print the name of the product.
First, we need to identify vegetarian items. Normally this information will be included with the data we requested from our database. But since we are using a simplified example, we will do it manually. We know that steak and fish are not vegetarian.
Notice, the condition I’m testing is if a product is not vegetarian. This is only because there are more vegetarian products on this list and I want the condition to be simple and the conditional to do the least amount of work. I could have just as easily tested for vegetarian items instead.
There are often many conditions that can be used to achieve the same goal. Writing good conditions that are efficient and readable is a useful skill that comes with practice.
So let’s write the condition that separates vegetarian from non-vegetarian.
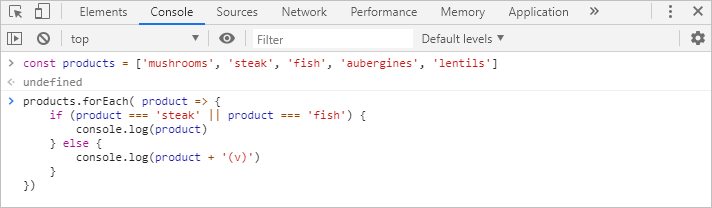
if (product === 'steak' || product === 'fish') {
    console.log(product)
} else {
    console.log(product + '(v)')
}
We want to place the conditional inside the loop. The loop gives us each product in the list to process individually. This conditional block is the code that we are executing for each product in our array of products now.
Refresh the browser to start with a fresh console, then enter the following:
The variable
productstoring our array of products.The
forEachloop iterating over the array.And our conditional block inside.
 The conditional block running inside of a loop
Execution
If we read the conditional code in plain English it says: “If the currently selected product is exactly ‘steak’ or ‘fish’ then log product to the console. Otherwise, in all other cases log product to the console but also add a string “(v)” to the end of it.”
Quick note, the === operator checks that the left and right expressions are exactly the same. and the || operator means or. We have two conditions to check here (steak or fish). If either of the two conditions is true it will execute the code within.
Hit enter to run the code and see the results.
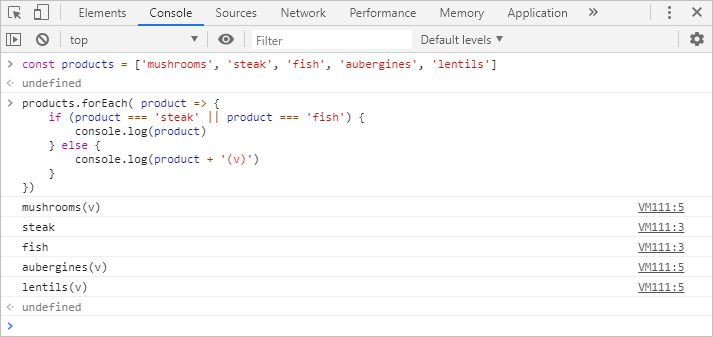 The result of the loop with the conditionals
And there it is. Every time the loop runs, it checks the currently selected element product and goes through the conditionals.
Is
productexactly the string ‘steak’?No. Check the following condition.
Is
productexactly the string ‘fish’?No. This condition is not met, the code inside will not execute. Go to the default code specified in the
elseblock.Print
productand add(v)to it.This iteration is finished. Start the next iteration.
If it finds ‘steak’ or ‘fish’ it will execute the code within that condition logging the product name without the "(v)". Then the loop finishes that iteration and starts the next, and so on. This process repeats for each element in the array until it’s all completed and the loop has logged the correct message for each one.
To recap, a conditional statement sets certain conditions. When met (which means when the condition evaluates to true) the code specified inside the conditional block executes. Otherwise, it is ignored and not executed.

Conclusion
If you’ve made it this far with me, I’m hoping that the next time you encounter these concepts you will find them easier to understand. And that it’s clearer why you need them, what they do, and how that helps you in a front-end context.
We saw how we organise data into data structures like the array. How this is usually stored in a database. That we can then request this data. Or that we can place it directly in our front-end code like in our small-scale example.
We saw how loops allow us to access this data and execute the same code repeatedly on each element. And we saw how conditionals allow us to execute different code when particular conditions are met or not.
In our example, we have only logged messages to the console. But we can use the same idea to manipulate the DOM to display and modify content on a website.
We use these same concepts for countless purposes in every kind of situation. Understanding this big picture is invaluable. The details don’t matter now. If you come out of this with a general idea of how the pieces of this puzzle fit together then it’ll make it easier to tackle each of the pieces in more detail.
Closure
Thanks for reading. I hope you found this useful. And if you enjoyed it, sharing it around would be greatly appreciated. If you have any questions or comments I’m on Twitter @Syknapse and I would love to hear from you.
](https://cdn-images-1.medium.com/max/2000/0*57gB7r7C13k2620e.png) Photo by Claudia
Photo by Claudia
My name is Syk and I’m a front-end developer at Lola Market in Madrid. I career-changed into web dev from an unrelated field, so I try to create content for those on a similar journey. My DMs are always open for aspiring web developers in need of some support. You can also read about my transformation in this article:
How I switched careers and got a developer job in 10 months: a true story This is how I career changed to front-end development at 40, starting with no relevant background experience or degree…
Expand
Further concepts to expand your understanding.
In this example we saw an array, data made up of strings, a forEach() loop, and an if else conditional. It is important not to forget that there is a lot more to each one of these concepts. We’ve only seen a single option of each that suited our example.
Below, I leave you with a little more information. Things you may want to look at next to understand these concepts more comprehensively and expand your knowledge about them.
The first port of call for me is always MDN as one of the most reliable sources of information for developers.
 I prefix my searches with MDN!
I like to look first at MDN’s definition and examples. If I find it too complex then I check out other sources to improve my understanding.
Data structures: Apart from arrays you will quickly need to get familiar with objects. That’s an even more common data structure. In fact, understanding objects is essential to understanding JavaScript as a whole.
Data types: The data we worked with here was made up of strings. But there are a few more types of data like numbers and booleans (true or false) that you will need to understand.
Requests: We briefly mentioned how usually we would make a request to our database to get the data we need to use. Working with APIs,
fetch(), making requests and handling the response is an advanced topic that you can safely leave for later. But one that’ll be essential by the time you are starting to interview for a developer job.Loops and array methods: Apart from our friend the
forEach()there are many more to learn. From the most basicforloop all the way to advanced methods likemap()andfilter()that are extremely powerful tools to get to grips with.Conditionals: The
ifstatement is one of the most commonly-used conditionals. But you will need to learn about others like thewhilestatement, the switch statement, or the very useful ternary operator.Conditions: Understand how to create conditions and how they are evaluated. For that, you need to become familiar with the concepts of “truthy” and “falsy”. This is when values that are not explicitly
trueorfalseare evaluated as such. For example, a string like'mushrooms'is considered true whereas an empty string''is always considered false.Logical operators and comparison operators: We saw those in our conditions. Logical operators like “and” and “or”, written
&&and||. Comparison operators like “equals” and “greater than”, written===and>. These are simple concepts that are the bread and butter of writing code.